


Adobe Chromium Embedded Framework Helper or Adobe CEF Helper is a vital process needed to Adobe Creative Cloud apps. This means that it is constantly working to ensure that all Creative Cloud applications run smoothly during their runtime and rendering processes.
CEF Helper renders several individual components of the Creative Cloud desktop application, such as the Applications tab, Files tab, and Discover tab. With this, you can see Adobe CEF Helper working through the different processes with similar names running in the background. This also makes the CEF helper extremely important for running the Creative Cloud desktop app. Still, there may be times when it faces issues such as high CPU or memory consumption. This could cause your system performance issues such as screen locks, lags, and glitches.
The nature of Adobe CEF Helper, however, is not the only reason to blame behind it. Other underlying issues within your system can also trigger this, which means there’s more to fixing the problem than just focusing on Adobe CEF Helper. This gives you a lot of solutions to try, including the simplest ones. For example, a simple restart of your PC would do the trick. You may also consider updating your Windows system, as your operating system may be incompatible with Adobe Creative Cloud products. You can also check if your Creative Cloud desktop app is on the latest version (Help > Updates). Nevertheless, you can also disable its auto-update feature as it highly contributes to the continuous functioning of the program and its background processes.
Also, try temporarily disabling system optimization software and third-party antivirus you have. The activities of the latter could possibly interfere with Adobe CC and CEF Helper and consider some of their processes as malicious acts. Instead of using Task Manager, manually disable all your third-party anti-virus programs one at a time to prevent them from starting automatically. Look for processes dedicated to your specific antivirus brand.
If the above suggestions don’t work for you, there are still other advanced solutions to try. Adobe also offers a chat support service for anyone experiencing high memory or CPU usage issues due to Adobe CEF Helper.
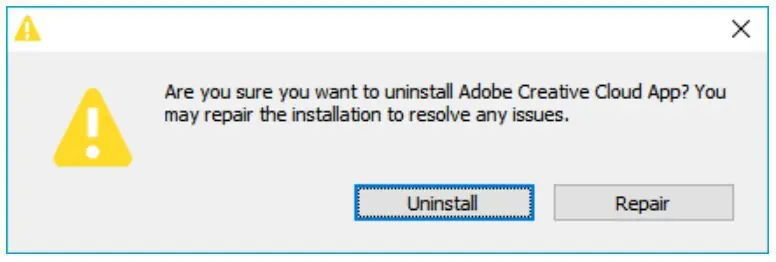
Use Creative Cloud Uninstaller to repair damaged files or reinstall Adobe Creative Cloud
- To download Creative Cloud Uninstaller which supplements the version of your Windows operating system.
- Once downloaded, extract the contents of the compressed file and run the executable file. Confirm when a prompt appears.
- When another prompt appears asking you to decide whether to remove the Creative Cloud desktop app, select Repair instead of Uninstall.
- Restart your PC and check if it works. Otherwise, you can repeat the process and try the uninstall option. Then download and install the latest version of the Creative Cloud desktop app on the official Adobe website.
System File Checker (SFC) scan as another way to repair damaged files
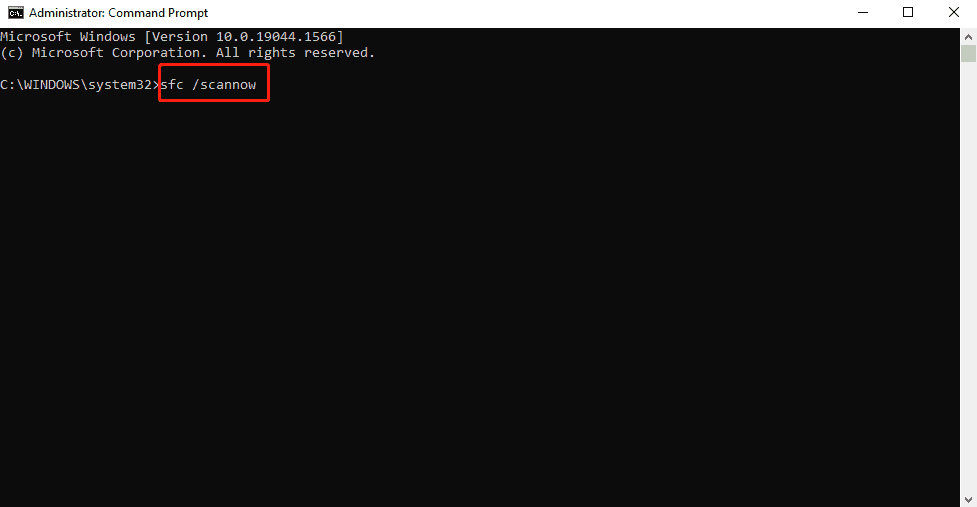
- Type ordered in windows search and right click on the result. Choose the “Run as administrator” option.
- When the command prompt appears, type “sfc /scannow” to start SFC scanning.
- Wait for the process to complete and restart your PC. If there are any corrupt system files causing Adobe CEF Helper to misbehave, SFC scan will find them and replace them with cached copies.
Completely terminate Adobe CEF Helper tasks via PowerShell to stop CPU usage
- Look for the PowerShell in your Windows search. Right-click on the result and choose the “Run as administrator” option.
- Paste the command taskkill /t /f /im “Creative Cloud Helper.exe” (including the quotes) in PowerShell and run it to prevent CEF Helper from using your CPU or memory while the PC is running.
Disable Adobe Creative Cloud auto-update feature

- Launch the Adobe Creative Cloud desktop app and click on the three horizontal lines in the upper left corner.
- Go to Preferences > General > Settings.
- Disable the “Always keep Creative Cloud up to date” button. Note, however, that one should always check for updates to avoid future issues caused by missed updates.
Prevent Creative Cloud from automatically opening each time the PC restarts
- Launch the Adobe Creative Cloud desktop app and click on your profile picture.
- Select Preferences and go to General.
- Disable the “Launch Creative Cloud on login” option by toggling the switch.
- Select Done to save changes and restart your PC. This should stop Creative Cloud from running automatically when you open the computer, but it won’t stop other processes. In this case, you can directly disable the automatic launch of Adobe CEF Helper.
Disable Adobe CEF Helper via Task Manager
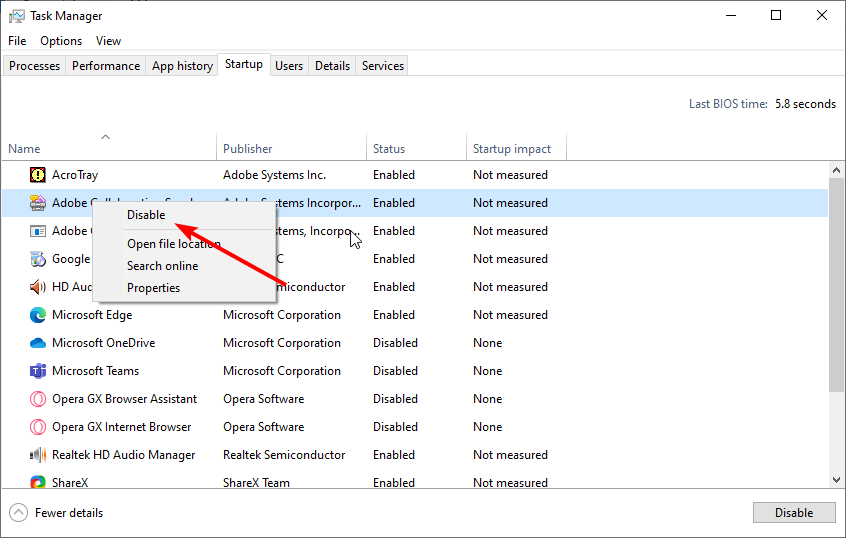
- Launch Task Manager. Under the Processes tab, find Adobe Creative Cloud and Adobe CEF Helper. Right-click on them and select End Task repeatedly until they disappear.
- Next, go to the Getting Started tab and search for Adobe Creative Cloud and Adobe CEF Helper. Right-click on it and select Disable.
- Restart your PC to check if it works. This will prevent Adobe CEF Helper from launching, which means that your CPU will no longer be used for Adobe Creative Cloud-related processes.
Perform a Clean Boot
- Launch the Run dialog box by pressing Win + R.
- Type MSConfig hasand press Enter.
- Under the General tab, check if “Selective Startup” is the one selected.
- Go to the Services tab and check the box next to the “Hide all Microsoft services” option. Click the Disable All button.
- Select Apply and then the OK button. Restart the computer. This will give you a system with a minimal set of drivers and startup programs by disabling unnecessary programs, like Adobe Creative Cloud and related processes.
Disable Adobe Creative Cloud file sync feature
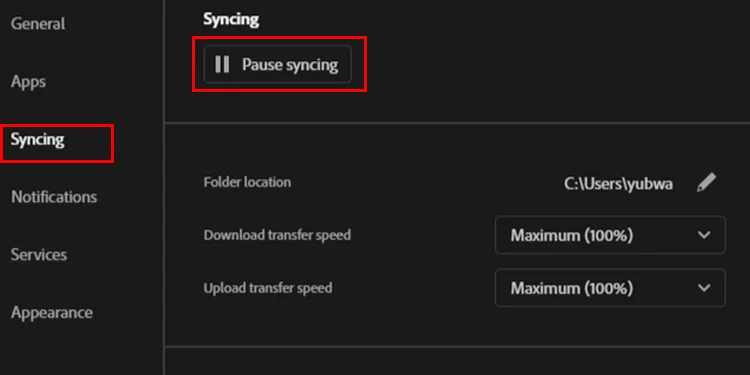
- Launch the Adobe Creative Cloud desktop app and go to Preferences > Sync.
- Click the Pause Synchronization button.


