As with any other application, VirtualBox can experience a number of issues, ranging from file corruption and malware infection to degraded performance. And although it’s not common, Windows updates are sometimes interrupted due to system incompatibility with VirtualBox.
In such cases, the obvious solution is to uninstall and, if necessary, reinstall VirtualBox. It sounds easy enough, but things don’t always go smoothly. As such, we have detailed how to properly uninstall VirtualBox using different methods in this article.
How to uninstall VirtualBox on Windows
The first two methods are easy to follow, but if they don’t work, you can also use the last two CLI methods to force uninstall VirtualBox. If your problem is not solved despite this, we recommend that you consult the last section for the steps to perform a complete removal.
Via app settings
Windows 11 introduced the ability to easily uninstall apps through app settings. Here are the necessary steps for this:
- Press Win + R, type
ms-settings:appsfeaturesand press Enter. - Click the triple dot button next to VirtualBox and select Uninstall > Uninstall.
- Accept the prompt to remove VirtualBox.
Via the control panel
On older versions of Windows, you can do the traditional method of uninstalling apps through Control Panel. Of course, you can also use this method on Windows 11 if you want. That said, here are the necessary steps:
- Press Win + R, type
appwiz.cpland press Enter. - Select VirtualBox and click Uninstall.
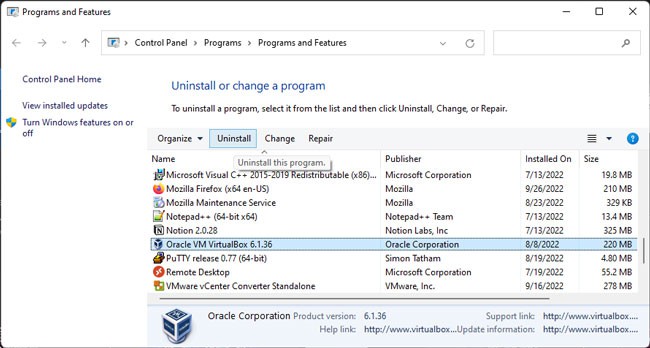
- Select Yes > Yes to accept the prompts and proceed with the installation.
To note: If you are trying to uninstall VirtualBox from the start menu, the same steps apply to that as well. And second, if VirtualBox is not listed in Apps & Features, you can work around the problem by downloading the installer for the same version of VirtualBox you had before and using said installer to remove VirtualBox. In case of an incomplete uninstall, you may need to reinstall VirtualBox first before you can successfully uninstall it again.
Via the command line interface
If you need to force uninstall VirtualBox, you can use the Get-Package and Uninstall-Package cmdlets in PowerShell. Here are the steps for that:
- Press Win + R, type
powershelland press CTRL + Shift + Enter. - Walk in
Get-Packageand write down the full name of VirtualBox.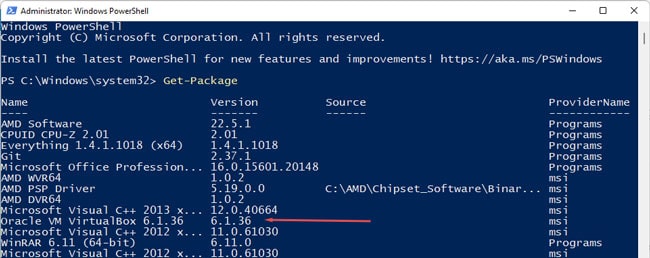
- Replace
packagenamewith the value of 2nd step and run the following command:Uninstall-Package -Name "packagename"
Provided that VirtualBox is registered with WMI, you can also uninstall VirtualBox with the WMIC utility. Here are the necessary steps:
- Press Win + R, type
cmdand press CTRL + Shift + Enter. - Type
wmic product get nameand press Enter.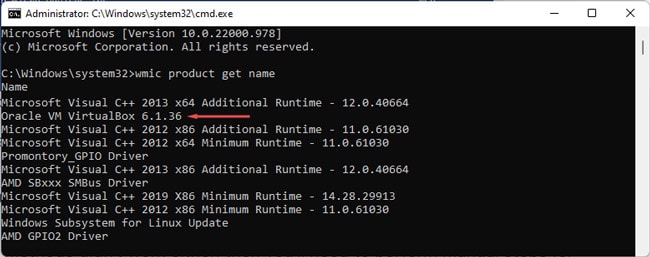
- It may take a minute to get the output. Once it appears, write down the full name of VirtualBox.
- Replace
program namewith the value from step 3 and run the following command:product where name="program name" call uninstall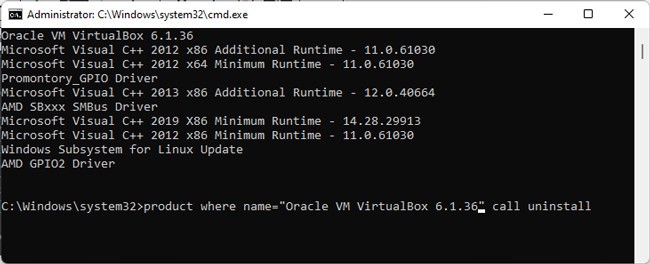
- Hurry Yes if asked for a confirmation prompt.
How to completely uninstall VirtualBox?
If the CLI methods also do not work, you will have to perform manual steps for complete removal. But before we get started, let’s get rid of the Windows Update incompatibility issue.
If you have installed Android emulators, such as LDPlayer, BlueStacks, Genymotion, Nox, Memu, etc., based on VirtualBox, you will want to remove them as we have found them to be the main cause of incompatibility. Mistake.
When deleting such emulators, the first step is obviously to uninstall them. You can do this using the uninstaller executable, through settings, or through the control panel. But the second part is also important. Often the error persists because some residual files remain on the system despite the uninstallation.
As such, you’ll want to clear files from locations such as the Temp folder, AppData, ProgramData, etc., and check the registry. The steps will be slightly different depending on the emulator you have installed, but you can check out the sections below to get a general idea of how to completely remove an app.
Now, to remove all traces of VirtualBox from your system, you must first log into an administrator account. If you plan to reinstall VirtualBox afterwards, temporarily disabling security programs and clean booting might also be a good idea.
Delete VirtualBox files
First, we will stop the VirtualBox background services, then proceed to remove the VirtualBox files from AppData, ProgramData, UserProfile, and System32. Here are the steps for that:
- Press Win + R, type
services.mscand press Enter. - Stop him VirtualBox System Service.
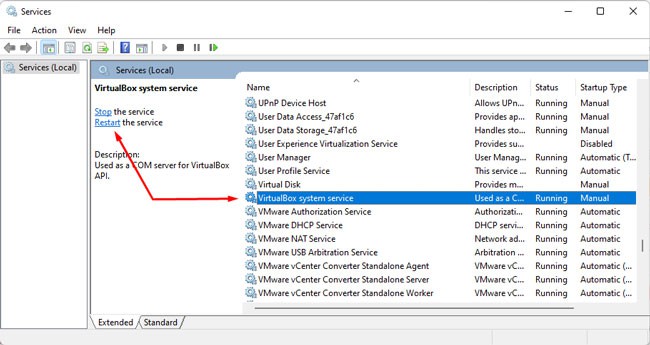
- If you want to delete the virtual machine files, navigate to the location where you stored them and delete them first.
- Now press Win + R, type
%userprofile%and press Enter. - Click on View > Show > Hidden Files.
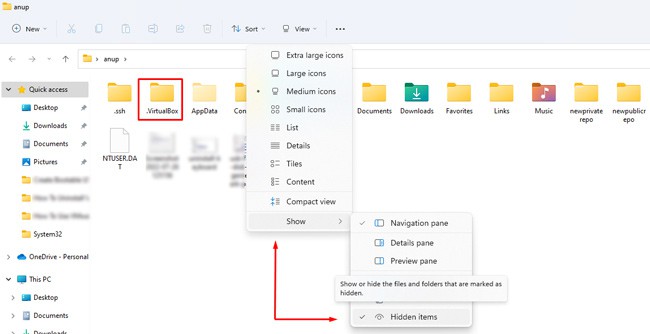
- Now delete the
.VirtualBoxfile here. It could also be located atC:\Users\<username>\Appdata\Local\. - Delete the Oracle folder from
C:\Program Files. - Also delete the VirtualBox folder from
C:\ProgramData. - Finally, go to
C:\Windows\system32\driversand delete the following files:VBoxNetAdp6.sysVBoxNetLwf.sysVBoxSup.sysVBoxUSB.sysVBoxUSBMon.sys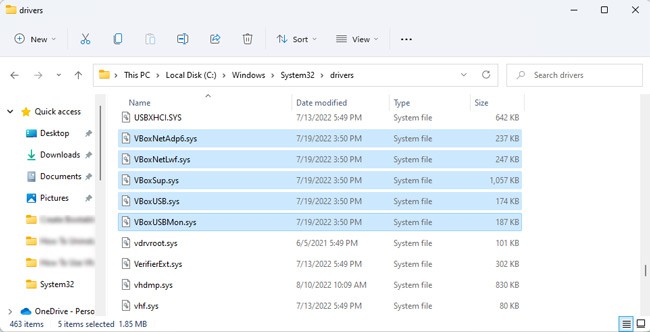
Uninstall VirtualBox Network Components
Now we will remove network adapters and VirtualBox drivers. Here are the steps for that:
- Press Win + R, type
devmgmt.mscand press Enter. - Select View > Show hidden devices.
- In the Network Adapters section, right-click on the VirtualBox adapter and select Uninstall Device > Uninstall.
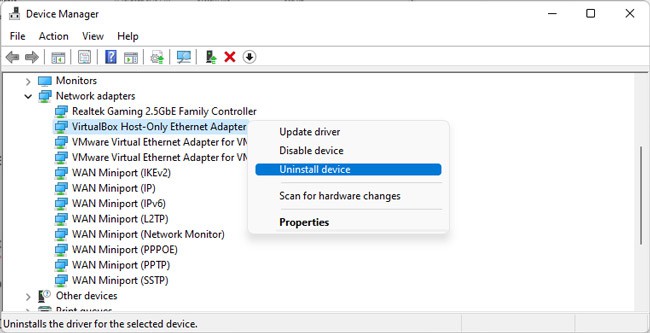
- Now press Win + R, type
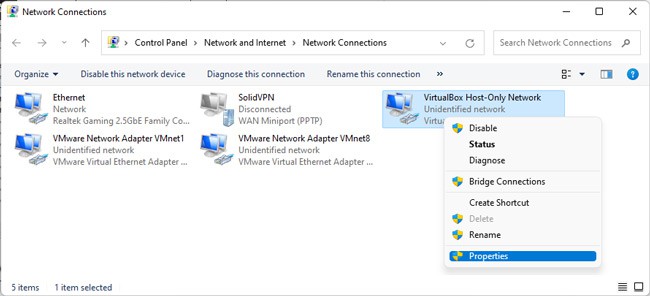
ncpa.cpland press Enter. - Right-click on the VirtualBox network and select Properties.
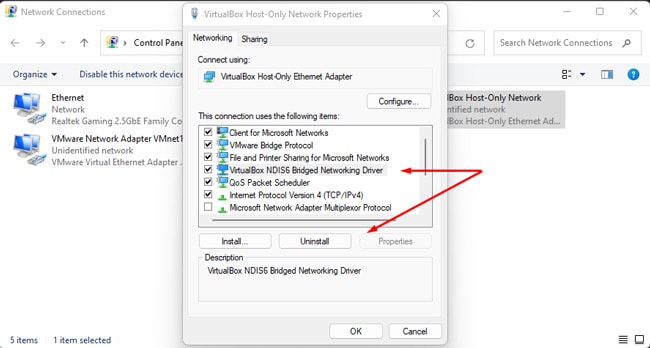
- Select the VirtualBox Bridged Network Driver and click Uninstall.
Delete VirtualBox registry entries
The final part of the puzzle is to clear all VirtualBox entries from the registry. Before making any changes to your registry, we strongly recommend that you follow the steps in the linked guide to back up your registry. This is important in case you need to undo changes. Once done, you can follow the steps below:
- Press Win + R, type
regeditand press Enter. - Move towards:
Computer\HKEY_CLASSES_ROOT\Installer\Products\. - Select the first key and check the Product Name. Repeat the same with the rest of the keys until you find the VirtualBox key.
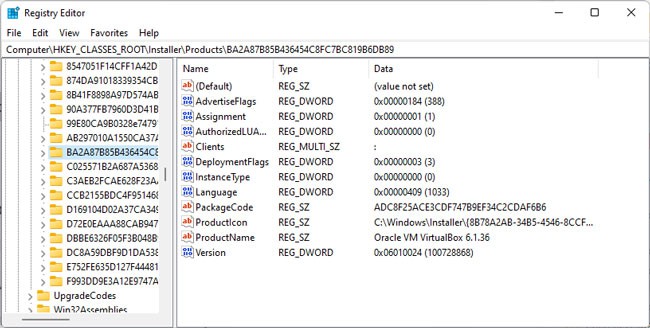
- First, note the key identifier and the product icon value.
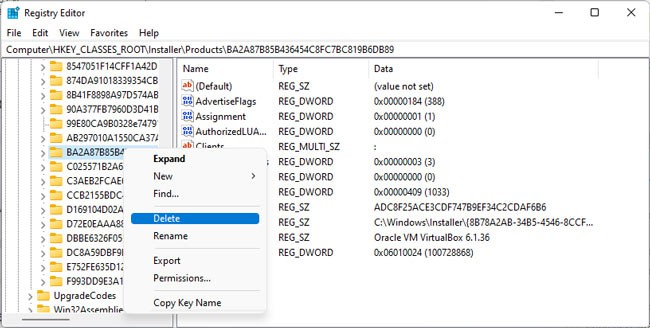
- Next, right-click on the VirtualBox key and select Delete > Yes.
- Now go to
Computer\HKEY_CLASSES_ROOT\Installer\Features\. - Use the values from Step 4 to make it easier for you to find and remove the VirtualBox key.
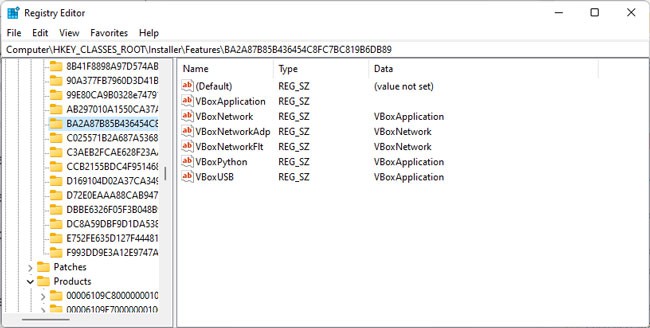
- Delete the VirtualBox keys from the following locations in the same way:
Computer\HKEY_LOCAL_MACHINE\SOFTWARE\Classes\Installer\Features\Computer\HKEY_LOCAL_MACHINE\SOFTWARE\Classes\Installer\Products\Computer\HKEY_LOCAL_MACHINE\SOFTWARE\Microsoft\Windows\CurrentVersion\Installer\UserData\S-1-5-18\Products\Computer\HKEY_CLASSES_ROOT\Installer\UpgradeCodes\Computer\HKEY_LOCAL_MACHINE\SOFTWARE\OracleComputer\HKEY_LOCAL_MACHINE\SOFTWARE\Microsoft\Windows\CurrentVersion\Uninstall\


