


Windows 11 has plenty of hidden tricks up its digital sleeve, from using advanced gesture controls to activating voice input so you can type hands-free. Some features are great for simply boosting your PC’s performance, but others are even better for getting you through a day’s work.
Whether you’re working or studying, navigating Windows 11 can sometimes be tedious. Whether it’s endless windows tormenting your screen or having to jump around that heap of clutter, your average workday feels like an endless nightmare of apps and windows. The good news is that it is not necessary.
While we have compiled a list of handy Windows 11 tips to make my life easier, the tips below have changed the way I work for the better – and many of them are easy to use. Check out the tips and tricks below to see if they make navigating Windows 11 that much easier.
1. Know when to take a break with Focus Sessions
Here’s the scenario: It’s been a long day, but you have to hang in there and produce a few thousand words before you can officially quit. But there’s a new show that just came out, people are constantly looking to chat, and there’s a cold one in your fridge calling your name. Procrastination is knocking at the door, but Windows 11 Focus Sessions will keep it at bay.
Similar to Focus Assist introduced in Windows 10, Focus Sessions keeps you on track for a set amount of time and lets you know when it’s time to take a short break before getting back to work. Plus, you can even add a to-do list through your Microsoft account to check off everything that needs to be done, and even link your Spotify account to listen to the right tunes or podcasts.
Best of all, it’s simple to light.
1. From the Start menu (you can also press Windows key + S), type “clock” and open the The clock setting.

2. In the left sidebar, click Tune-up sessions.
3. Set your daily goals by adjusting the number of minutes you want to work or study.
4. Tap Start Focus Session and get to work.

Windows will give you a 5 minute break every 30 minutes, although you also have the option of skipping breaks altogether. But don’t do that to yourself, give yourself some much-needed downtime.
2. Create new virtual desktops to manage your workload
With the many tasks people need to accomplish during an average work day, your desktop can quickly turn into a jumble of open apps and windows. Despite the clutter, you wouldn’t want to close them all in case you deleted something you’ve spent hours working on. If only there was a way to start fresh without losing everything you’ve done…
With Windows 11, of course. Even better, it stares you in the face in the taskbar. The Task View button lets you quickly see all currently active apps, but it also lets you create a new virtual desktop so you can start fresh.

1. On the taskbar, click the Task View icon.
2. Click new office.
3. Click on the newly created desktop.
So. You now have a new windowless virtual desktop while keeping the original as it is. Additionally, you can quickly switch between the desktops you create by pressing Ctrl + Windows key + left/right arrow key. This can be useful when working on a large number of tasks that require special attention. Or, better yet, when you want to switch from work to play.
For those who constantly forget where the Task Manager is or can never find where to access the Run command without first Googling it, fear not.
While Windows 11’s Start menu is an easy way to get to pinned apps and more, it doesn’t give you easy access to the nooks and crannies of your PC. Luckily, there’s a somewhat secret Start menu hidden within the icon that gives you a set of options, such as accessing your system specs, opening the task manager and the Run command, checking device and computer management, and more.
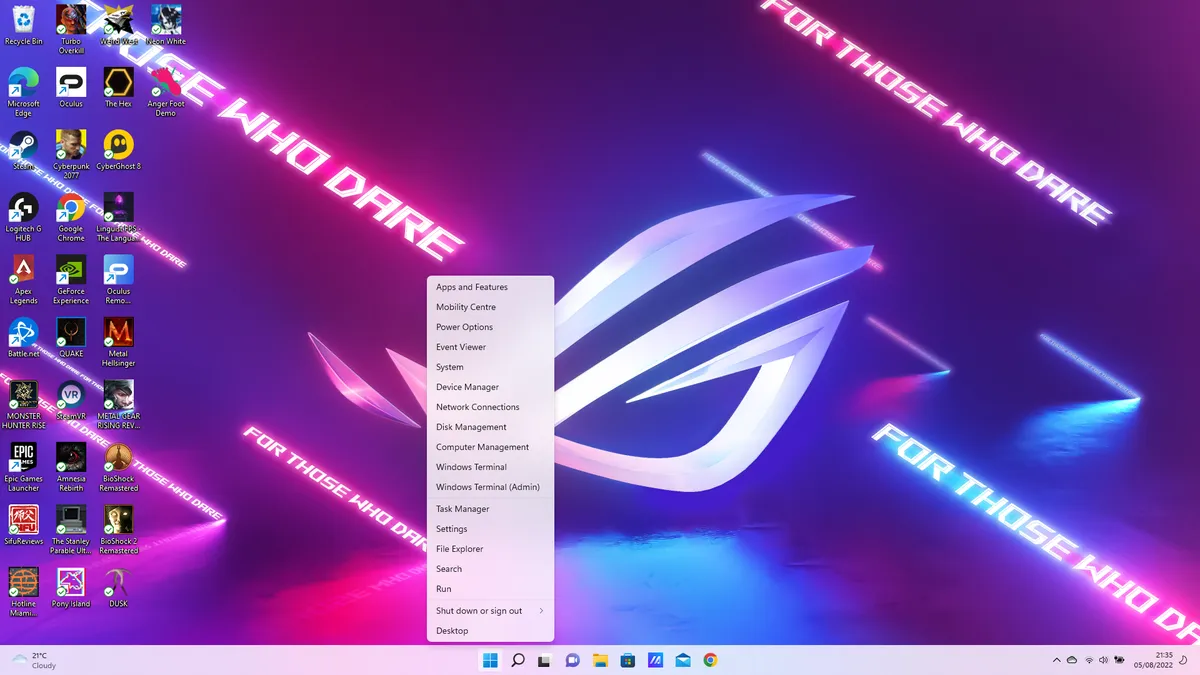
All it takes is a simple right-click on the Start menu icon and the formerly hidden menu will appear. However, an even easier way is to hit Windows key + X and the menu will appear. Plus, you can navigate using the directional keys and press Enter, all without touching your mouse or trackpad.
4. Who needs a mouse when you can open pinned apps with keyboard shortcuts?
Speaking of not needing your mouse, there’s an easy way to switch between apps on the fly. For multitaskers who are constantly moving between different documents, windows, and apps, it can save you a lot of time when you have to move your cursor to open another window to search for something quickly, only to return to the app you were on. work.
For all apps pinned to the taskbar, you can access each one individually with a quick keyboard shortcut. All you have to do is tap Windows key + [Number key] and the app will immediately open or appear as you left it. Numbers are assigned to apps after the Chat app in the taskbar. For example, pressing Windows key + 1 will open File Explorer, while Windows key + 5 will open Google Chrome on my PC.
You can mix and match apps that you think suit your style, and it’s an easy way to switch between apps, especially if you’re in the zone while typing and quickly need to check something in. another window.
Okay, your mouse or trackpad aren’t that bad, because they have a few tricks up their sleeve too. Having multiple windows open can be overwhelming at times, and navigating between them means the one you need can get lost in a sea of other open apps, all because you have to scroll down in another window.
What if you didn’t need to click on a window to scroll down? This is where background scrolling comes in, and it’s probably already enabled on your PC without you realizing it. It lets you scroll inactive windows across the screen, so you can strategically place windows on top of each other and keep scrolling, even if it’s not the targeted apps.
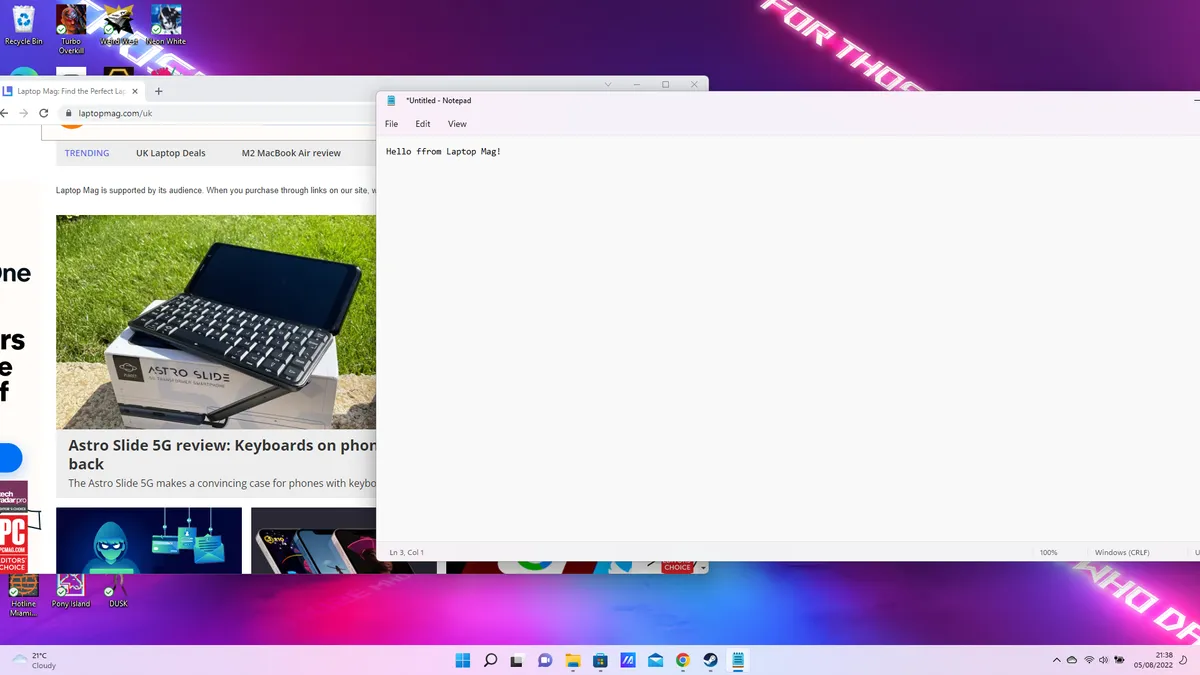
For example, all you have to do is open two windows (like Google Chrome and Notepad) and place them wherever you want on your screen. When typing in Notepad, just hover your cursor over Google Chrome and you will be able to scroll without needing to click on it to make it active. This is incredibly handy when you have a selection of windows open but only need to work in one.
If this feature does not work, you may need to enable it in the settings:

1. Open Settings.
2. In the left sidebar, click Bluetooth and devices.
3. Navigate to “Scroll inactive windows when hovered over them”. Flip the switch to turn it on.


